

Repairing Vintage Radio Speakers Safely: A Step-by-Step Guide
Last Updated: November 3, 2026
Quick Summary
Repairing vintage radio speakers safely starts with unplugging the radio and proving the chassis is dead before you reach inside, since filter capacitors can hold dangerous voltage long after the cord is pulled. Discharge capacitors through a proper bleeder resistor, never a screwdriver, and verify zero voltage with a meter before touching anything.
- A switch on the front panel does not remove line voltage from every circuit point.
- Shorting a charged capacitor with a screwdriver can arc, damage the cap, and burn your hand.
- For an 8-ohm speaker, a healthy voice coil typically reads between about 6 and 8 ohms DC resistance.
- In-circuit testing can mislead you because parallel resistors or crossover networks change the reading.
- Removing the speaker safely takes about ten minutes once the chassis is discharged.
Table of Contents
- Before You Touch the Chassis: High-Voltage Safety for Tube Radios
- How to Choose a Vintage Radio Speaker That Actually Fits
- Testing Antique Radio Speakers: Continuity, Cone, and Coil Checks
- Antique Radio Speaker Impedance Matching Without Guesswork
- Step-by-Step: Safely Removing the Speaker From the Chassis
- Common Mistakes That Ruin Vintage Radio Speakers
- Ordering the Right Replacement Speaker for Your Model
- Frequently Asked Questions
Before You Touch the Chassis: High-Voltage Safety for Tube Radios
Repairing vintage radio speakers safely starts with one rule: unplug the radio and prove the chassis is dead before you reach inside. Many tube radios hold dangerous voltage in their filter capacitors long after the power cord is pulled. Hobbyists often learn this the hard way. A speaker swap on a tube set is not a simple parts job until the chassis is safe to touch.
The risk is real. Large electrolytic filter capacitors can store a charge for minutes, hours, or longer depending on the circuit. So treat every chassis as live until you prove otherwise with a meter, not with a guess.
Here is the safe order of operations:
- Unplug the radio and never rely on the power switch alone. Pull the cord from the wall outlet. A switch on the front panel does not remove line voltage from every circuit point.
- Wait several minutes, then check for residual voltage with a meter. Set your multimeter to DC volts on a range above the expected B+ voltage. Touch the probes across each filter capacitor's terminals, observing polarity.
- Discharge capacitors through a proper resistor, not a screwdriver. A bleeder resistor of the appropriate value and wattage will drain the cap slowly and safely. Clip one end to the cap terminal and the other to chassis ground, then wait and re-check voltage.
- Verify zero voltage before touching anything. Re-measure across every filter capacitor. If any reading above a few volts remains, repeat the discharge and wait longer.
- Keep one hand behind your back while probing. This reduces the chance of a hand-to-hand shock path across your chest.
- Work on a dry, non-conductive surface. Remove metal watchbands, rings, and necklaces before you start.
Watch out: shorting a charged capacitor with a screwdriver can arc, damage the cap, and burn your hand. Use a bleeder resistor instead, and never assume a capacitor is discharged because the radio has been off for a while.
How to Choose a Vintage Radio Speaker That Actually Fits
Fit is the whole game when you choose a vintage radio speaker. A replacement that looks right but mounts wrong will cost you a return and a wasted evening. So measure before you buy.
Start with these checks:
- Mounting holes: measure center-to-center spacing and frame shape
- Depth: confirm the magnet clears the cabinet and chassis
- Impedance: match the original rating, often 8 ohms
- Power rating: meet or slightly exceed the original wattage
- Wiring: note whether leads are soldered or use a plug
A common mistake is ordering by brand name alone. Two radios from the same maker can use different speakers. Compare the part number stamped on the frame, then match it to a listing that shows the same markings.
Check the cone too. A used speaker with a torn cone or rusted frame may test fine and still sound bad.
Testing Antique Radio Speakers: Continuity, Cone, and Coil Checks
Testing antique radio speakers comes down to three checks: look, measure, and listen. Do them in that order and you will catch most failures before you install anything.
First, inspect the cone. Look for tears, separated seams, and rust at the frame. A cracked cone often buzzes at higher volume. Gently push the cone inward with two fingers; it should move smoothly without scraping. A scraping sound or gritty feel points to a misaligned or dirty voice coil.
Next, test continuity. Set your multimeter to ohms and touch the test leads to the speaker terminals. You want a reading near the rated impedance. For an 8-ohm speaker, a healthy voice coil typically reads between about 6 and 8 ohms DC resistance, because the rated impedance is measured at AC, not DC. A 4-ohm speaker often reads around 3 to 4 ohms.
Here is how to read the result:
- Open circuit (no reading): the voice coil is broken, so replace the speaker
- Near the rated ohms: the coil is likely good
- Climbing or jumpy reading: a dirty or rubbing voice coil, often a sign of trouble
- Much lower than rated: a shorted turn in the coil, which usually means replacement
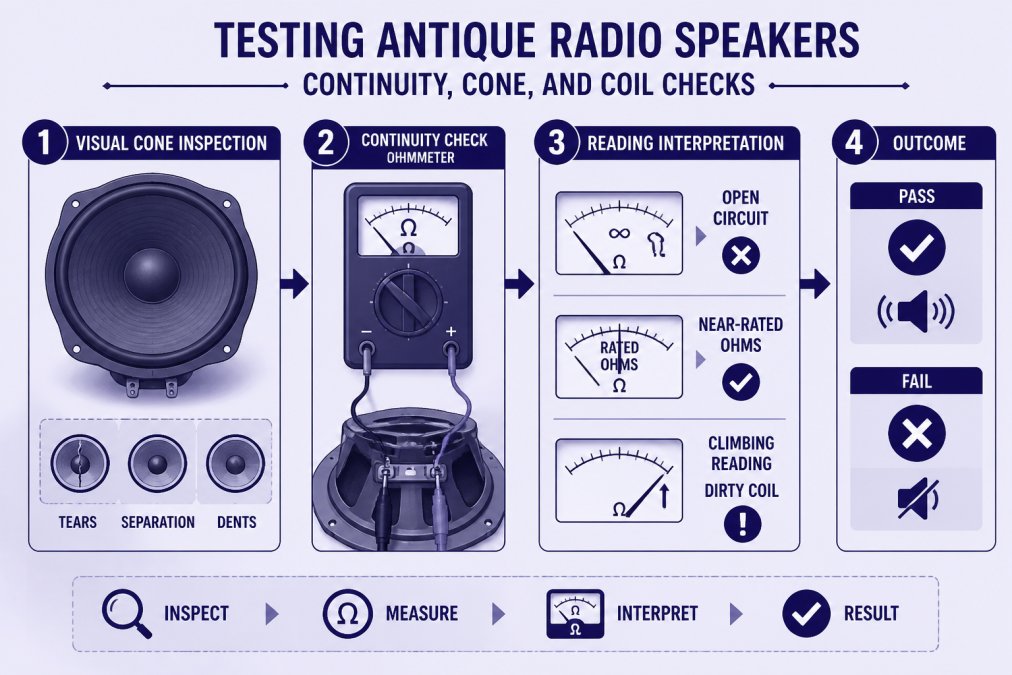
One limit most guides skip: in-circuit testing can mislead you. Other parts in the circuit, such as a parallel resistor or a crossover network, can change the reading. Pull the speaker or lift one lead for a true result. If you cannot isolate the speaker, treat an in-circuit reading as a rough screen only.
A meter check proves continuity, not sound quality. A speaker can pass and still rattle. That is why we test used parts before we list them.
Midland 77-101B Maxon 8 Ohm 2W Speaker Tested CB Radio Parts →
Reading the ohms result tells you whether the voice coil is worth keeping.
| Meter reading | What it means | Action |
|---|---|---|
| Open circuit (no reading) | Voice coil is broken | Replace the speaker |
| Near the rated ohms | Coil is likely good | Keep the speaker |
| Climbing or jumpy reading | Dirty or rubbing voice coil | Often a sign of trouble |
| Much lower than rated | Shorted turn in the coil | Usually means replacement |
Antique Radio Speaker Impedance Matching Without Guesswork
Antique radio speaker impedance matching is simpler than it sounds: match the original rating. Most vintage CB and radio speakers run at 8 ohms. If you swap in a 4-ohm speaker, you can overload the audio stage. Go too high and the volume drops.
So find the original spec first. Check the stamp on the old speaker frame or the radio's service data. Then buy to that number.
Here is the short version:
- Match impedance exactly when you can
- Match or slightly exceed the power rating
- Never guess based on cabinet size
Step-by-Step: Safely Removing the Speaker From the Chassis
Removing the speaker safely takes about ten minutes once the chassis is discharged. Go slow and label as you go.
- Discharge and verify. Confirm no voltage remains on the filter capacitors.
- Photograph the wiring. Snap clear photos of the leads and their routing before you touch them.
- Desolder or unplug the leads. Note which wire goes to which terminal.
- Remove the mounting screws. Support the frame so it does not drop onto the chassis.
- Lift the speaker straight out. Watch for the magnet catching on nearby parts.
Watch out: tugging on stiff, aged wire can break it at the terminal. Heat the joint and let the solder release.
Keep the old screws and grommets. They are often hard to replace.
Common Mistakes That Ruin Vintage Radio Speakers
The biggest mistake is skipping the discharge step. For more ways to avoid damage, see our vintage radio repair tips. A charged capacitor can damage the radio and hurt you. Safety first, every time.
Other common errors:
- Forcing a speaker that does not match the mounting pattern
- Over-tightening screws and warping the frame
- Mixing up the lead polarity
- Tearing the cone while prying it free
- Testing in-circuit and trusting a false reading
Ordering the Right Replacement Speaker for Your Model
Ordering the right replacement speaker starts with your model number and the markings on the old part. Give us both, and we can point you to the correct fit.
We organize our parts by brand and model, so you are not guessing. Our founder, Jack Scott, personally oversees the customer experience. If you are not a tech expert, tell us your radio's model and what you are hearing.
Frequently Asked Questions
How do you test a vintage radio speaker for continuity?
Set a multimeter to the lowest ohms range and touch the probes to the speaker's two terminals. A working vintage radio speaker reads close to its rated impedance, typically 4, 8, or 16 ohms. An open circuit reading means the voice coil is broken and the speaker needs replacement. A reading far below the rating can indicate a shorted coil. Disconnect the speaker from the chassis first so the radio's circuitry does not skew the result.
Is it safe to repair a torn speaker cone in an antique radio?
Small tears in a paper cone can be repaired with a thin layer of flexible adhesive and tissue paper, but the repair only works if the voice coil is still good and the tear is not at the cone edge where it meets the frame. Test continuity first. If the coil reads open, patching the cone will not restore sound. For heavily damaged cones, a tested replacement speaker is the more reliable path.
Can you replace a vintage radio speaker with a modern equivalent?
Yes, if the impedance and mounting dimensions match. Modern speakers often use different frame shapes and mounting hole spacing, so measure the original opening and bolt pattern before ordering. Match the impedance exactly to avoid straining the audio output stage. A tested original pull like the Midland 77-101B Maxon 8 ohm 2W speaker is available; compare its photos and mounting before ordering.
How do you safely remove a speaker from a vintage radio chassis?
Unplug the radio and let the filter capacitors discharge for several minutes before opening the case. Photograph the wire routing, then desolder or unplug the speaker leads, noting which terminal connects where. Support the speaker with one hand while removing the mounting screws so it does not drop onto the chassis. Keep the original grommets and hardware; cracked rubber mounts are common on older units and affect how the speaker sits.
Getting a vintage radio back on the air should not feel like a gamble. At SCOTT RADIO & ELECTRONICS, we stock hard-to-find vintage CB radio parts organized by brand and model, test our used speakers before listing them, and back every order with personal service from our founder. Skip the guesswork and the wrong-fit returns. Get started with SCOTT RADIO & ELECTRONICS and find the exact speaker your radio needs.
