

What Are the Best Vintage Radio Repair Tips?
Last Updated: October 26, 2026
Quick Summary
The best vintage radio repair tips start with safety: unplug the set, discharge electrolytic capacitors with a resistor probe, and inspect the power cord before touching anything inside. Then follow a fixed diagnostic order, replace worn paper and electrolytic capacitors on sight, and power up through a dim-bulb tester or isolation transformer after every repair.
- Discharge electrolytic capacitors with a resistor probe before reaching inside a radio.
- Follow a fixed order: inspect, check power, test tubes or components, check capacitors, trace signal.
- A constant hum almost always traces to worn electrolytic capacitors in the power supply.
- Match capacitance closely and use a voltage rating at or above the original.
- Use an isolation transformer every time you work on an AA5 set.
Table of Contents
- Start With a Safety Checklist Before You Touch a Vintage Radio
- Vintage Radio Troubleshooting: A Beginner-Friendly Diagnostic Flow
- Vintage Radio Repair Tools and What Each One Is For
- Antique Radio Capacitor Replacement: When to Swap and What to Buy
- Repair Tips by Radio Type: Tube Radios, AA5 Sets, and Vintage CB Gear
- Vintage CB Radio Restoration: Parts Sourcing and Compatibility
- When to DIY and When to Hire a Technician
- Find the Right Part for Your Restoration Project
- Frequently Asked Questions
Start With a Safety Checklist Before You Touch a Vintage Radio
Vintage radio repair starts with safety, not solder. Old tube sets can hold dangerous voltage long after they are unplugged, so a few minutes of caution protects both you and the equipment.
Run through this checklist before any vintage radio troubleshooting begins:
- Unplug the radio and let it sit; filter capacitors can store a charge after shutdown
- Discharge electrolytic capacitors with a resistor probe before reaching inside
- Inspect the power cord for cracked insulation and replace it if worn
The Occupational Safety and Health Administration electrical safety guidance is a good refresher on shock hazards if you are new to working around high voltage.
Watch out: skipping the discharge step is the most common way beginners damage a radio or hurt themselves.
Vintage Radio Troubleshooting: A Beginner-Friendly Diagnostic Flow
Vintage radio troubleshooting follows a fixed order: inspect, check power, test tubes or components, check capacitors, then trace the signal path. Working in sequence stops you from replacing good parts while the real fault sits elsewhere.
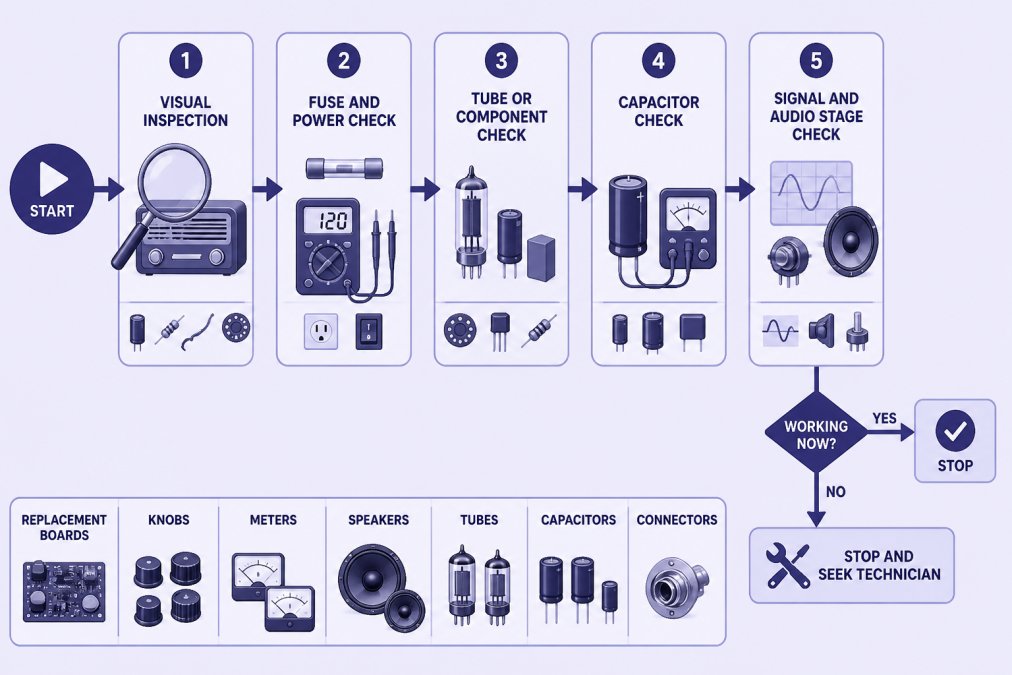
No Power, No Sound, or Constant Hum: Where to Look First
No power usually points to the cord, fuse, or power switch. No sound with power on often means a failed audio output tube or a dead speaker.
Use this symptom-to-check table as your first pass. It is not a substitute for a schematic, but it keeps you from jumping to capacitors before you have confirmed power is reaching the set.
| Symptom | First Check | Next Check | Stop and Reassess If |
|---|---|---|---|
| Dead, no dial lamp | Power cord continuity, fuse, switch | Transformer primary resistance | Fuse blows again after replacement |
| Powers on, no sound | Speaker voice coil continuity | Audio output tube and output transformer | You hear nothing at all with a signal tracer at the volume control |
| Constant hum | Electrolytic filter capacitors | Rectifier tube or solid-state rectifier | Hum remains after filter replacement |
| Weak reception | Antenna connection, tuner contacts | RF and mixer tubes, alignment | Only one band is weak |
| Intermittent sound | Tube socket pins, control pots | Solder joints and chassis grounds | The fault follows a tap test |
Reading the Symptom Instead of Guessing
A few mechanisms explain most beginner-visible faults. A fuse that opens immediately on power-up usually means a shorted rectifier or a failed filter capacitor, not a bad fuse. A hum that rises with volume often comes from the audio stage, while a hum that stays constant with volume at zero points back to the power supply filters. Weak reception on one band but not another usually means a tuner or band-switch contact problem rather than a failed tube.
When to Stop and Hand It Off
Stop the diagnostic flow and seek a technician when the fault sits in the RF or alignment stages, when you cannot measure voltages safely without an isolation transformer, or when the radio is rare enough that a mistake is costly. Also stop if a fuse blows again after one correct replacement, if you smell overheating, or if you cannot identify a component against the schematic.
Testing After Each Repair Step
After every repair, power the set through a dim-bulb tester or isolation transformer before full line voltage. A bright bulb indicates a short; a dim bulb that brightens as tubes warm is normal. Confirm the symptom is gone before moving to the next stage, and recheck the fuse rating against the schematic. This step-by-step confirmation is what separates a repair that lasts from one that returns.
Vintage Radio Repair Tools and What Each One Is For
The right vintage radio repair tools make the difference between guessing and knowing. You do not need a full shop, but a handful of basics covers most jobs:
- Multimeter: checks voltage, resistance, and continuity
- Soldering iron: removes and refits components cleanly
- Desoldering pump or wick: clears old solder from joints
A dim-bulb tester is worth building, too. It flags a short before full power reaches the set.
Antique Radio Capacitor Replacement: When to Swap and What to Buy
Antique radio capacitor replacement is the single most common repair on old sets. Paper and electrolytic capacitors dry out and leak with age, and they cause hum, weak reception, and dead audio. Swap any wax-covered paper capacitor and any bulging or leaking electrolytic you find.
Before buying, confirm the part fits your chassis. Our guide on how to verify vintage radio part compatibility walks through matching values and mounting. When you are ready to order, the Browning R-27 capacitor and resistor lot is a used original replacement part removed from a Browning R-27.

Electrolytic vs. Paper Capacitors: Spotting the Failures
Electrolytics usually show bulging cans, crusty residue, or a swollen bottom. Paper capacitors look like wax-covered tubes and often crack or leak wax. Both fail quietly, so replace them on sight rather than waiting for a bench test to confirm.
Browning R-27 Capacitor & Resistor Lot →
Matching Values Without Guessing
Match capacitance closely and voltage at or above the original rating. For electrolytics, a modern replacement with the same microfarad value and an equal or higher voltage rating is the safe choice; going higher on voltage is fine, going lower is not. For paper capacitors, match the microfarad value and choose a film replacement rated at least as high as the original voltage.
Document Before You Desolder
Photograph the chassis before you remove anything, and note each capacitor's value, voltage, and lead orientation. Electrolytics are polarized: the negative lead goes to the marked side, and reversing it can cause the replacement to vent. Mark the original wiring with tape or a sketch so you can confirm the new part goes back the same way. This record also helps the next owner or technician.
Sourcing and Compatibility
Buy from a supplier that lists capacitance, voltage, tolerance, and lead spacing, and compare those against your chassis before ordering. For model-specific parts, match by brand, model, and mounting; a capacitor that looks right can still miss your set. Keep a small stock of common values so a single failed part does not stall the project.
Testing After Replacement
After replacing capacitors, power the set through a dim-bulb tester or isolation transformer before full line voltage. A bright bulb indicates a short, often a reversed electrolytic or a solder bridge. Recheck the fuse rating against the schematic, confirm the hum or dead audio symptom is gone, and only then move to the next stage.
Repair Tips by Radio Type: Tube Radios, AA5 Sets, and Vintage CB Gear
Repair approach shifts with the radio type. Tube radios need careful voltage checks and tube testing. AA5 sets, the All American Five design, run without a power transformer, so treat the chassis as live and use an isolation transformer every time.
For CB work, our step-by-step vintage CB radio restoration guide covers the full teardown. If the channel selector is the fault, the dedicated channel selector repair guide handles that job directly.
| Radio Type | First Check | Common Fault | Typical Fix |
|---|---|---|---|
| Tube radio | Power supply | Failed electrolytics | Replace capacitors |
| AA5 set | Chassis isolation | Live chassis shock risk | Use isolation transformer |
| Vintage CB | Channel selector | Worn contacts | Clean or replace switch |
Vintage CB Radio Restoration: Parts Sourcing and Compatibility
Vintage CB radio restoration lives or dies on parts fit. A knob or board that looks right can still miss your model, so match by brand, model, and mounting before you buy.
When you need a specific component, the Browning R-27 control potentiometer and switch set and the Midland 77-092 main circuit board assembly are good examples of model-matched parts.


When to DIY and When to Hire a Technician
Hiring a technician makes sense when the fault sits in the RF or alignment stages, when you lack an isolation transformer, or when the radio is rare enough that a mistake is costly. Basic electronic repair like capacitor swaps, cleaning controls, and replacing a fuse holder is well within reach for a careful beginner.
The line is simple: if you cannot test it safely, do not power it up.
Find the Right Part for Your Restoration Project
Sourcing quality parts is the step that decides whether a restoration finishes or stalls. Our buyer's guide to quality radio parts covers how to spot good components and avoid dead stock. Our parts are organized by brand and model, and our founder Jack Scott personally oversees the customer experience.
Frequently Asked Questions
What should I check first when a vintage radio does not work?
Start with a visual inspection before plugging anything in. Look for a cracked power cord, missing knobs, a blown fuse, and any scorched or swollen components on the chassis. Confirm the radio model against a service manual or schematic diagram so you know what you are looking at. If the cord or fuse holder is damaged, replace those parts first. Only after the set passes that basic inspection should you move on to voltage checks and component testing.
Is it safe to turn on an old radio before repairing it?
Not without precautions. Old electrolytic and paper capacitors can short and take out a transformer, and tube radios store high voltage even after unplugging. Bring power up slowly on a variac or dim-bulb tester if you have one, and never poke around inside a plugged-in set. If you are not comfortable working around high voltage, have the set checked by a technician before its first power-on in decades.
How can I tell whether a vintage radio needs new capacitors?
Common signs include a loud constant hum, weak or distorted audio output, and a set that works briefly then fades. Visually, look for bulging electrolytic capacitor cans, crusty residue around paper capacitor ends, and cracked or melted wax. In antique radio capacitor replacement, the usual practice is to swap electrolytics and paper capacitors as a baseline service, then retest. The Browning R-27 capacitor and resistor lot is a used original replacement part removed from a Browning R-27 and is listed at $15.00. The donor radio was tested and working before disassembly, as confirmed by the seller; compare mounting, connectors, and markings before purchase.
What tools do I need to repair a vintage radio?
At minimum: a multimeter, a soldering iron with a fine tip, solder, desoldering braid or a pump, insulated screwdrivers, needle-nose pliers, and a dim-bulb tester or variac for safe power-up. A signal tracer and an oscilloscope help with weak signal and audio output faults but are not required to start. Keep a schematic diagram and a notebook for component values and wiring notes. Add a set of contact cleaner for switches, controls, and contacts.
When should I take a vintage radio to a professional repair technician?
Hire a technician when the fault is in the power transformer, when the set has been modified with unknown wiring, or when you lack the test equipment to trace a weak signal stage. Also stop if you are uncomfortable around high voltage or if the cabinet is valuable enough that a mistake would hurt its condition. A technician can also confirm whether a repair cost is reasonable compared with the radio's value before you spend more on replacement parts.
Getting a stubborn vintage set back on the air takes patience and the right components. SCOTT RADIO & ELECTRONICS stocks hard-to-find replacement boards, knobs, meters, and speakers, organized by brand and model, with personal service from our founder. Get started with SCOTT RADIO & ELECTRONICS and add the exact part your restoration needs to your cart.
