

7 Proper Storage Rules for Vintage Radio Electronics
Last Updated: November 6, 2026
Quick Summary
Vintage radio storage works best between 60°F and 75°F with relative humidity held at 40% to 50%. Control temperature, humidity, dust, and handling so circuits, cabinets, and moving parts survive months or years without power. Check readings with a cheap digital thermometer-hygrometer and log them.
- Buy a cheap digital thermometer-hygrometer and check readings weekly for the first month, then monthly.
- Seal the enclosure, add desiccant, and never bag a radio on a humid day.
- Refresh silica gel every few months, or dry it in a warm oven and reuse it.
- Photograph the front, back, and labels, and remove batteries before boxing.
- Open the enclosure and inspect the radio every three to six months.
Table of Contents
- Why Proper Storage for Vintage Radio Electronics Decides Whether It Survives
- Vintage Radio Storage Temperature and Humidity: Setting Measurable Targets
- How to Prevent Corrosion in Vintage Radio Equipment
- How to Pack an Antique Radio for Storage
- Storage Guidance by Radio Construction: Wood, Plastic, and Metal Cabinets
- Dust, Pests, Mold, and Other Contaminants Inside the Enclosure
- Periodic Inspection and Vintage Radio Safety Before Use
- Choosing Replacement Parts for a Radio Coming Out of Storage
- Frequently Asked Questions
Why Proper Storage for Vintage Radio Electronics Decides Whether It Survives
A working set pulled from a garage with a rusted chassis and cracked cabinet is a common story among collectors.
Below are seven rules, in order, for storing a radio so it comes back out in the same shape it went in.
Vintage electronics age even when switched off: capacitors dry out, paper labels absorb moisture, steel rusts quietly.
Vintage Radio Storage Temperature and Humidity: Setting Measurable Targets
Vintage radio storage temperature and humidity should stay between 60°F and 75°F with relative humidity held at 40% to 50%. Those two numbers do more for long-term survival than any other choice you make.
Most guides say "keep it dry" and stop there. Dry is not a target; a target is a number you can read off a gauge.
A Storage Environment Plan You Can Check With a $15 Meter
Buy a cheap digital thermometer-hygrometer and place it where the radio sits. Check weekly for the first month, then monthly, and log the readings.
- Temperature: 60°F to 75°F, steady. Big swings matter more than the average.
- Relative humidity: 40% to 50%. Below 30% dries out paper and rubber. Above 60% invites corrosion.
- Light: dark or dim. Direct sunlight fades dial faces and heats cabinets.
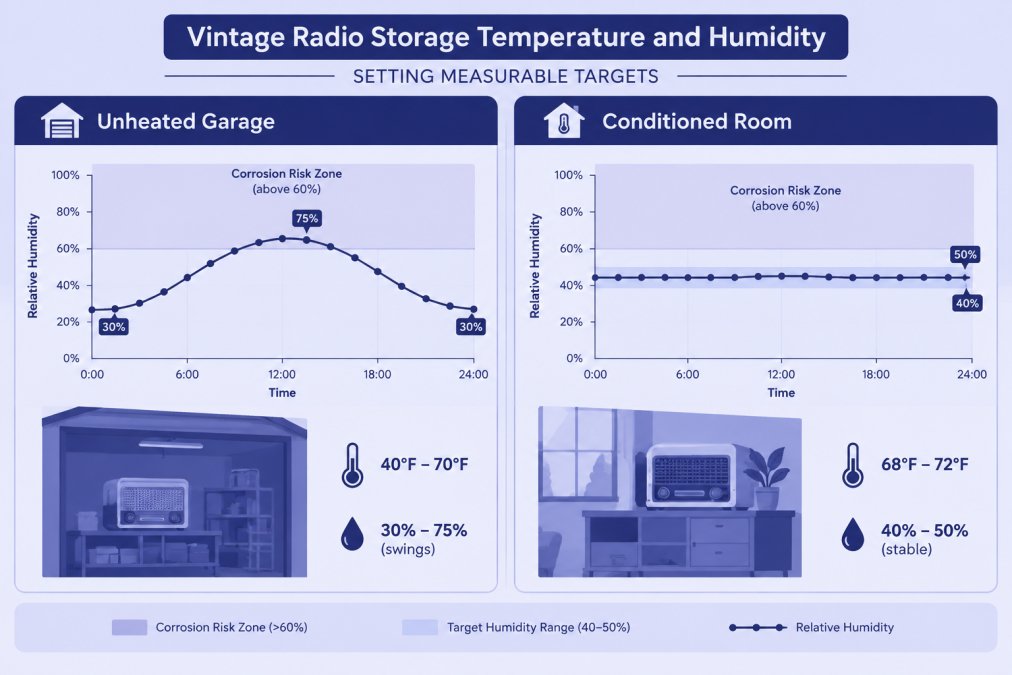
Cold Storage and Unheated Spaces: What Actually Happens
An unheated garage or attic feels safe because it is out of the way, but it is the worst place for a tube radio. Cold surfaces pull water vapor from the air, and it lands on your chassis as condensation.
Each warm spell followed by a cold night cycles the metal through another wet-dry round; rust needs repetition, not a flood.
How to Prevent Corrosion in Vintage Radio Equipment
Corrosion is the number one killer of stored radios, attacking chassis screws, meter movements, switch contacts, and the thin plating on tuning capacitors.
Watch out: sealing a radio in a plastic bag on a humid day traps that damp air inside with the metal. Bag it on a dry day, or skip the bag and use a breathable cover instead.
Desiccant, Enclosures, and Breathable Covers Compared
| Method | How it works | Best for | Watch out for |
|---|---|---|---|
| Silica gel desiccant | Absorbs water vapor inside a sealed space | Sealed totes and cabinets | Needs recharging; saturates over time |
| Breathable cloth cover | Blocks dust, lets air move | Shelved radios in climate-controlled rooms | No moisture protection on its own |
| Sealed plastic tote | Blocks air and pests | Long-term storage in a stable room | Traps damp air if sealed on a humid day |
| Plastic bag | Cheap barrier | Short trips and moves | Condensation risk; not for long storage |
Refresh silica gel every few months, or dry it in a warm oven and reuse it. A small pack goes a long way in a sealed tote.
How to Pack an Antique Radio for Storage
Packing an antique radio for storage means cleaning it, removing what should not stay inside, protecting the cabinet and dial, and bracing the set so nothing shifts in the box. Do the prep first; the box is the last step.
A radio packed in a hurry is a radio packed wrong. Loose knobs snap off, and a shifting chassis cracks a wood cabinet.
Preparation Checklist Before the Box Closes
- Photograph the front, back, and any labels before you touch anything
- Note the model and serial number for future parts searches
- Dust the exterior with a soft brush; skip wet cleaners on wood
If you need to open a cabinet to reseal it or check the interior, use a screwdriver that fits the screws properly. A Yellow Straight Handle Lithium Ion Electric Screwdriver With 4 Torque Settings lets you set low torque for fragile vintage fasteners.

Storage Guidance by Radio Construction: Wood, Plastic, and Metal Cabinets
Storage guidance by radio construction matters because wood, plastic, and metal fail in different ways, and so do the dial faces, speakers, and chassis parts attached to them.
Wood Cabinets and Veneer
Wood moves with humidity; a steady 40% to 50% relative humidity keeps veneer and solid wood from splitting when dry or swelling and lifting when damp. Keep wood cabinets off concrete floors, which wick moisture upward, and away from heating and cooling vents that create local hot and dry pockets.
- Dust with a soft brush or a vacuum on low suction with a brush attachment; skip wet cleaners that can lift finish or swell veneer.
- Pad corners and edges with acid-free tissue before wrapping, because veneer chips at the corners first.
- Do not wrap bare wood tightly in plastic film; if the finish is intact, a breathable cloth cover is safer for long storage.
Plastic and Bakelite Cabinets
Plastic and Bakelite cabinets fail from heat, sunlight, and chemical contact more than humidity. UV light yellows and embrittles plastic, and heat accelerates both. Store these sets in the dark at stable room temperature, away from foam padding that can off-gas and stain or soften the surface.
- Keep plastic sets out of direct sunlight and away from windows, even in a climate-controlled room.
- Avoid stacking heavy sets on plastic cabinets; Bakelite cracks under sustained load.
- Do not use solvent cleaners before storage; residue can migrate into the plastic.
Metal Chassis and Plating
Metal is the highest rust risk and the part most often hidden inside the cabinet. Chassis steel, plated tuning capacitors, and switch contacts all corrode when moisture sits on them. Elevate the set off the floor, add desiccant inside a sealed enclosure, and check for condensation after any temperature swing.
- Keep bare metal from direct contact with wood and foam, which can hold moisture against the surface.
- After a cold snap, let the set come to room temperature before opening the enclosure so condensation forms on the outside, not the chassis.
- Watch out: a chassis that looks clean can still have corrosion starting at screw heads and ground lugs, so inspect those points specifically.
Dials, Speakers, and Fragile Components
Dial faces, pointers, and speaker cones are the parts most easily damaged in storage and the least often addressed.
- Paper and celluloid dial faces absorb moisture and can warp or stain; keep humidity in the 40% to 50% band and avoid pressing anything against the dial.
- Speaker cones are fragile and attract pests; cover the grille with breathable cloth and check for chewed cones at each inspection.
- Loose knobs and pointers should be padded with acid-free tissue so they cannot snap off if the box shifts.
For any cabinet type, measure the set before you buy covers or containers. A 150mm 100mm Electronic Digital Caliper Carbon Fiber Dial Vernier Caliper Gauge Micrometer Measuring Tool Digital Ruler 92388425781 Tnsxg gives you accurate dimensions so covers and totes fit the first time.

Dust, Pests, Mold, and Other Contaminants Inside the Enclosure
Dust, pests, and mold are the slow threats. Dust coats tuner contacts and traps moisture. Mice nest in warm chassis spaces and chew wiring.
Cover shelved radios with a breathable cloth cover, not a tight plastic sheet. Breathable fabric blocks dust while letting trapped moisture escape.
Check stored sets for droppings, chewed insulation, and musty smells at every inspection.
For a deeper look at keeping delicate meters and dials clean, read our guide on how to protect vintage CB radio meters. If you are sealing a radio against dust, Sharp 2260 Top And Bottom Dust Covers For The Mainboard give the mainboard dedicated protection.

Periodic Inspection and Vintage Radio Safety Before Use
Periodic inspection and vintage radio safety before use is where most storage plans quietly fail. A radio can sit a year in a sealed tote and still come out with condensation, corrosion, or pest damage if nobody opens the box. Build an inspection schedule into the plan, and treat the first power-up as a separate, deliberate procedure.
An Inspection Schedule You Can Actually Keep
Check the storage environment weekly for the first month, then monthly once readings are stable.
At each inspection, log the following:
- Gauge readings: temperature and relative humidity at the radio, not across the room.
- Condensation: any film or droplets on metal, glass, or the inside of the enclosure.
- Corrosion: screw heads, ground lugs, plated tuning capacitor fins, and switch contacts.
Short-term swings show up as condensation on cold metal, while sustained high humidity shows up as corrosion and musty odor. If the gauge swings widely but averages in range, fix the airflow and insulation around the enclosure; if the average drifts above 50% relative humidity, fix the room.
Recovering a Radio from Cold Storage
Bringing a cold set into a warm room is when condensation risk peaks. Do not open the enclosure in the warm room; let the sealed set sit at room temperature for several hours, ideally overnight, so condensation forms on the outside of the enclosure rather than on the chassis.
- Keep the enclosure closed until the set reaches room temperature.
- After opening, check the chassis and dial for condensation before doing anything else.
- If condensation is present, stop and let the set dry in a stable, low-humidity room.
Safety Inspection Before Powering Up
Never plug in a stored set blind. Work through the inspection in order, and stop if anything looks wrong.
- Inspect the power cord for cracks, brittle insulation, and damaged plugs; replace it if damaged.
- Look for bulging, leaking, or split capacitors, and for scorched or brittle wiring.
- Check for rust, corrosion, and pest damage on the chassis and inside the cabinet.
- Confirm the set is fully dry and at room temperature.
- Power it up gradually on a controlled source and watch for smoke, odd smells, or unusual noise; shut it down immediately if any appear.
Electrical safety is not optional with old tube gear. If you are unsure about the cord, capacitors, or chassis condition, have a qualified technician check it before the first power-up.
Choosing Replacement Parts for a Radio Coming Out of Storage
Choosing replacement parts for a radio coming out of storage means matching the part to your exact model and year, not just the brand.
When a stored radio comes out with a dead meter or cracked knob, get the model and serial number first, then match the part to that model.
If your SWR gauge failed after storage, our guide on CB radio meter replacement tips walks through the fix.
Frequently Asked Questions
What is the best way to store a vintage radio?
Clean it, pull the batteries, and wrap it in a breathable cloth cover before placing it in a rigid box on an elevated shelf. Keep the room between roughly 60 and 75 degrees Fahrenheit with relative humidity near 40 to 50 percent. Avoid plastic bags sealed tight against the cabinet, since trapped moisture drives corrosion. Add a fresh desiccant pack, label the box with the date, and check the radio every three to six months so small problems stay small.
Can vintage radios be stored in an unheated space?
Yes, but with conditions. An unheated garage or attic works if the temperature stays above freezing and humidity stays controlled, because the real enemy is condensation from repeated warm-cold swings. Insulate the radio from the concrete floor, keep it off exterior walls, and use a sealed tote with a desiccant pack rather than open shelving. Check the desiccant monthly in humid months. If the space floods or stays damp, move the gear indoors instead.
Should you remove batteries before storing an old radio?
Always. Old alkaline and carbon-zinc cells leak potassium hydroxide that eats traces, battery contacts, and wiring, and the damage often totals a board. Remove every cell, including coin cells on the clock or memory circuit, and inspect the compartment for white crust or green residue before storage. If you find leakage, neutralize it with a little white vinegar on a cotton swab, let it dry fully, then clean the contacts. Store the radio without batteries and note the cell size on the box.
How often should you inspect a vintage radio in storage?
Every three to six months is a practical rhythm. At each visit, open the box, smell for mustiness, look for white or green corrosion on chassis and contacts, check the desiccant for saturation, and confirm no pests have moved in. Log the date and any changes so you can spot trends in humidity. If you store in an unheated space, inspect monthly during humid summer months, since that is when condensation and mold do their damage.
Storing a vintage radio well takes a plan, not a shelf. If a stored set comes out needing a new meter, knob, or board, SCOTT RADIO & ELECTRONICS carries hard-to-find vintage CB radio parts organized by brand and model, with personalized service from our founder. Get started with SCOTT RADIO & ELECTRONICS and bring your classic set back to life.
